Tutorial on android development for beginners. The documentation includes the fundamental concepts on android programming.
Unit 1.0: Introduction to Android
What is Android?
- An OS and programming platform developed by google.
- Includes SDK(Software Development Kit) to write code and assemble software modules to create apps for android users.
Why develop apps for Android ?
- Address business Requirement.
- Reach the majority of mobile users.
Best Experience for app users
- Android provides touch interface.
- To develop apps using SDK Java programming language is used to develop the app.
- Extensible Markup Language(XML) file to describe data resources.
- Android Studio: IDE to develop android apps.

- Apps: Your apps and core system apps stays at this level.
- Java API framework: UI, resource management and lifecycle management. No details of how API’s work is required. Only learn how to use them.
- Libraries and runtime: Core system components and services are built from native libraries written in C or C++. Android services has its own runtime. These native libraries are available to apps through Java API framework.
- HAL: Consists of library modules which implements an interface for a specific type of hardware component such as Camera or Bluetooth module.
- Linux kernel: Foundation for android. Upper layers rely on Linux kernel for threading, Low level memory management etc.
Note: Use android support library to use recent android platform API’s on older devices.
Challenges to develop android app:
- Design UI elements that work on all devices.
- Use ProGuard in Android Studio. ProGuard helps to detect and remove unused classes, fields, attributes, methods etc
- Encrypt the code while packaging app.
- Remain Compatible with older versions.
Unit 1.1: Develop first android app
The development process:
- Start with an idea then determine the requirements for the idea.
- Sketch UIs for various app functions.
- In android studio:
- Create Project
- Define Layouts
- Write Code
- Build and Run
- Test and debug
- Publish
Steps
- Start Android studio project providing an application name. The project name should be same name that you would want for the app. Company domain name should be a unique package name if you want to publish the app in Google Play.
- When choosing Target Android Devices, Phone and Tablet are selected by default. The Minimum SDK declares the minimum Android version for your app. Each successive version of Android provides compatibility for apps that were built using the APIs from previous versions. That means your app should always be compatible with future versions of Android, if you use the documented Android APIs.
- Select activity template then configure your project
Gradle is used for build process: Build.gradle(Project: apptitle) should not be edited to include app dependencies. Build.gradle(Module: app) is used to declare dependencies. This build.gradle exists for every module.
Layout files include the layouts for activities and Resource files include all necessary resources including layouts, drawable, mipmap and values.
Unit 1.2: Layout and Resources for UI
For a button
Attributes:
- Id
- Layout width
- Layout height
- Layout margin end
- Layout margin start
- Layout margin top
- Background
- Onclick
- Text
- Text color
- For a text
- Text alignment
- Text color
- Text size
- Text style
Syntax: android:attribute_name = “value” Example: android: textStyle= “bold” If the value is a resource then @symbol is used to determine what kind of resource Example: android: background = @color/myBackgroundColor To identify a view id is used. Android:id = “@+id/button_count” Note: “+” symbol is used to indicate new id is created.
Positioning a view
LinearLayout positioning
android: layout_width android: layout_height android: orientation
layout_width and layout_height takes either match_parent or wrap_content or a fixed number of dp(density independent pixels) orientation can be horizontal or vertical. android: layout_gravity is used to place the UI element with respect to its parent. Example: android: layout_gravity = “center_horizontal”
RelativeLayout positioning: arrange child view with respect to its parent
android: layout_toLeftOf: positions right edge of this view to left of another view. android: layout_toRightOf: left edge of this view to right of another view. android: layout_centerHorizontal: Centers the view horizontally with respect to its parent. android: layout_centerVertical: vertically centers w.r.t its parent. android: layout_alignParentTop: top edge of this view matches with top edge of parent. android: layout_alignParentBottom: bottom edge of this view is matched with bottom edge of the parent.
Style related attributes
android : textStyle android : textSize android : background android : text android : textColor
Resource Files
- Stores strings, colors, menu text, styles, layouts, dimensions. It includes:
- drawable
- layout
- menu
- mipmap
- values
Syntax to reference a resource in XML file: @package_name: resource_type/resource_name If resource is referenced from res then package_name is not required. Example: android : text = “@string/button_label_toast”
Color: colorPrimary is used for app bar is a predefined base color.
The onClick attribute
android: onClick = “showToast” Here showToast() is a method that is to be defined in MainActivity.java. It must be public and return void. Method defines what is to be done when button is clicked.
Updating view:
mShowCount = (TextView) findViewById(R.id.show_count); // when mShowCount is updated TextView is updated. android:onClick= “countUp”
Public void countUp(View view){ mCount++; If (mShowCount != null) mShowCount.setText(Integer.toString(mCount)); }
Here mCount is converted to string and set string as text for mShowCount object. mShowCount.setText() method updates the text view on the screen.
Unit 1.3: Scrolling Views
Complex layout with ScrollView will suffer from performance issues. Better not to use images or long list of items. For that Recycler View is preferred.
When using linear layout inside scroll view. For layout_width use match_parent and for layout_height use wrap_content. match_parent //occupies space equal to parent view. wrap_content //occupies space only that is required. ScrollView supports vertical scrolling. So android:orientation = “vertical” For horizontal scrolling we use HorizontalScrollView
Unit 1.4:Recycler Views
Display large scrollable datasets by maintaining limited number of view items. The RecyclerView keeps as many View items as can fit on the screen, plus a few extra at each end of the list to make sure that scrolling is fast and smooth.
To display data in a RecyclerView: requirements
- Data(from database or cloud)
- A RecyclerView(scrolling list, container of view items)
- Layout for one item of data(all items will look same so same layout can be used. Item layout is separate from activity because one view item at a time can be created and filled with data.)
- Layout manager(Organizes layout of the items in RecyclerView. Instance of Recyclerview.LayoutManager)- recycles a view and asks adapter to update contents.
note: For LinearLayout android system handles the layout. But for RecyclerView explicit layout manager is required.
- Adapter(To connect data to RecyclerView. RecyclerView.Adapter extension is used. Prepares data and how it will be presented in a viewholder. When data changes adapter updates the contents of respective list item.)
- ViewHolder(extension of RecyclerView.ViewHolder. To contain information for displaying one view item.)
Adapter helps two interfaces to work together.
Implementing a RecyclerView
- Add the RecyclerView dependency if needed(depending on activity template)
- Add RecyclerView to activity layout.
- Create a Layout XML file for one View item.
- Extend RecyclerView.Adapter and implement onCreateViewHolder() and onBindViewHolder() methods.
- Extend RecyclerView.Viewholder to create view holder for item layout. You can add click behaviour by overriding onClick() method.
- In the Activity inside onCreate() method create RecyclerView and initialize it with adapter and layout manager.
Steps:
- In Build.gradle put support library. Implementation ‘com.android.support:recyclerview-v7:28.0.0’
- Add RecyclerView in XML.
- Specify layout manager type in xml or code.
- Initialize RecyclerView inside activity or fragment using find view by id method.
- Create a layout file for single item in RecyclerView.
- Create adapter that describes how data is displayed inside each item.
- Data source (database/Xml/JSON/Array list)
- Number of items.
- Use onCreateViewHolder to link adapter with layout from 4.
- Use the onBindViewHolder to show data inside adapter for each position.
Unit 2.1 : Activities and Intents
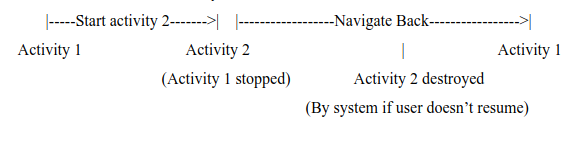
Application is a collection of activities created or that you reuse from other apps. Activities are independent of each other.
The main activity is the first activity that is seen when users launch an app. Each time a new activity starts, previous activity is stopped. But the system preserves activity in a stack (back stack). When the user presses the back button the activity is popped from the stack and is destroyed. Then the previous activity resumes.
- Creating an activity
- Creating an activity java class
- Implement basic UI for Activity in XML layout file.
- Declare the new activity in android manifest.xml file.
While creating a new project or adding a new activity by choosing File > New > Activity, template automatically performs above steps.
Create an activity
When we create a new project in Android Studio and choose backward compatibility(AppCompat), Main Activity will be by default a subclass of AppCompatActivity class. The AppCompatActivity class will help you to use up-to-date android features(app bar and Material Design). It also makes it compatible with devices having older versions of Android.
Activity Life Cycle: The set of states an activity can be in: when it is first created, when it is stopped or resumed and when a system destroys it.
The first task in activity subclass is to implement standard Activity lifecycle callback methods to handle state changes for your activity. For example onCreate() method.
onCreate()
- required method the app must implement.
- All essential components of your activity is initialized here.
- System calls this method when it creates the activity.
- It calls setContentView() to create primary layout for the activity.
In more than one XML layout files, UI for the activity is defined. When the setContentView() method is called with path to the layout file, the system creates all initial views from specified layout and adds them to the activity. => inflating the layout.
onPause()
- Is called when user is leaving the activity
- Doesn’t mean activity is destroyed.
- Commit the changes done before.
Implement activity’s UI in the layout file => XML file.
AndroidManifest.xml file
- Activity is declared here. While creating new activity or starting a project activity is declared.
Intent:
- Message object that sends request to android runtime to start an activity.
- Also used to pass data between one activity and another.
Types:
Explicit: Used to call a specific component. Suppose activity B is launched from activity A. then explicit intent is used to call directly targeting activity B. explicit intent is always delivered to the target, not consulting filters.
Implicit: You know what is to be done. But don’t know which activity is to be launched. Or, user has option to choose between various components. Implicit intent is delivered to a component only if it can pass through one of the component’s filters.
Unit 2.2: Activity lifecycle and state
Activity lifecycle: set of states an activity can be in during its entire lifetime, from the time it is created to it is destroyed.
Activity state and lifecycle callback methods :

Unit 3: Retrofit:
- Retrofit is REST client for JAVA and android.
- 3 things to integrate retrofit to android application:
- Retrofit library
- Interface with network calling method.
- POJO class to get data from server.
- Add retrofit dependency.
- Describe endpoint API.
- JSON mapping.
- Creating Retrofit client and executing our requests.
Dependencies: Implementation ‘com.squareup.retrofit2:retrofit:2.1.0’ Implementation ‘com.squareup.retrofit2:converter-gson:2.1.0’
Android-Manifest.XML: <uses-permission android:name= “android.permission.INTERNET” />
API description:
- To send an HTTP request HTTP methods are used. HTTP methods include GET, PUT, POST, DELETE etc.
- To understand how these methods work, it is important to know about URI, URL, URN.
- URI: (Uniform Resource Identifier) It is a string of characters used to identify resources on a computer network using either location, name or both.
- URL: (Uniform Resource Locator) identify resource on the basis of location.
- URN: (Uniform Resource Name) identify resource on the basis of name.
- URL is more specifically preferred than URN.
Difference between GET and POST method:
Transfer data from client to server in HTTP.
GET: data is sent as URL parameters. @GET(“users/list”)
Describing query parameters in URL: @GET(“users/list?sort=desc”)
URL Manipulation: @GET(“group/{id}/users”)